How to Use the List View Editor
Navigate the unified key sidebar + per-key detail pane — switch between Grid and List layouts, track validation at a glance, and edit every locale for one key in one place.
StringLane's single editor surface is a sidebar of keys on the left and a per-key detail pane on the right. Select a key → every locale's value appears in the detail pane. This replaces the old split Table/List view with one focused layout.

Layout
- Sidebar (280px, left) — namespace-grouped key tree, search, filter popover, command-palette launcher at the bottom. Stays visible while you work.
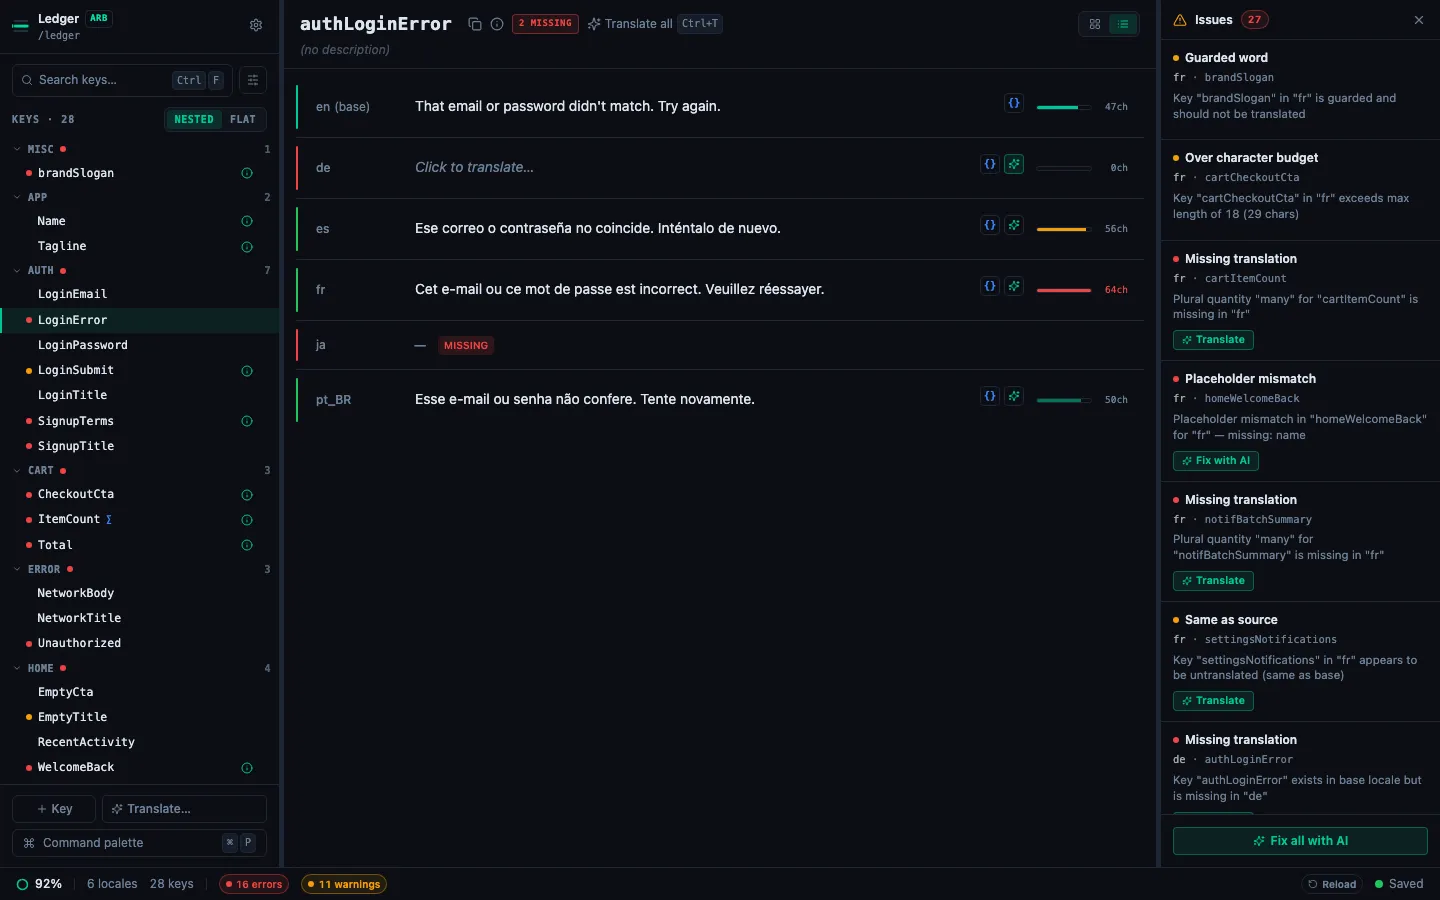
- Detail pane (main area) — header (key name + chips + Grid/List toggle) and a locale layout showing every locale side-by-side.
- Issues panel (right rail or bottom drawer) — collapsible; auto-opens when the project has validation issues.
- Status bar (bottom) — completion ring, error/warning chips, "Saved · Ns ago" indicator.
Switching between Grid and List layouts
The detail header has a Grid / List segmented toggle. Your choice persists per-project.
- Grid — locale cards in a 3-column grid. Best for short strings and projects with 3–6 locales.
- List — locale rows stacked with a wider value field. Best for longer strings, or when you want char-width bars inline per locale.
Default is Grid for ≤6 locales, List otherwise. Flip it any time.
Navigating the key sidebar
Keys are grouped by their first namespace segment (before . or _). So settings.theme, settings.density, and settings.fontSize all live under a collapsible settings group.
- ⌘F (or click the search input) — focus the sidebar search. Type to filter across all namespaces.
- ↑ / ↓ — move between visible keys.
- ⌘→ / ⌘← — next / previous key in the filtered list.
- Nested / Flat toggle — segmented control under the search input switches between namespace-grouped and flat alphabetical views.
- Click the filter icon (next to search) to open the filter popover — pick locale, toggle Issues-only, clear all.
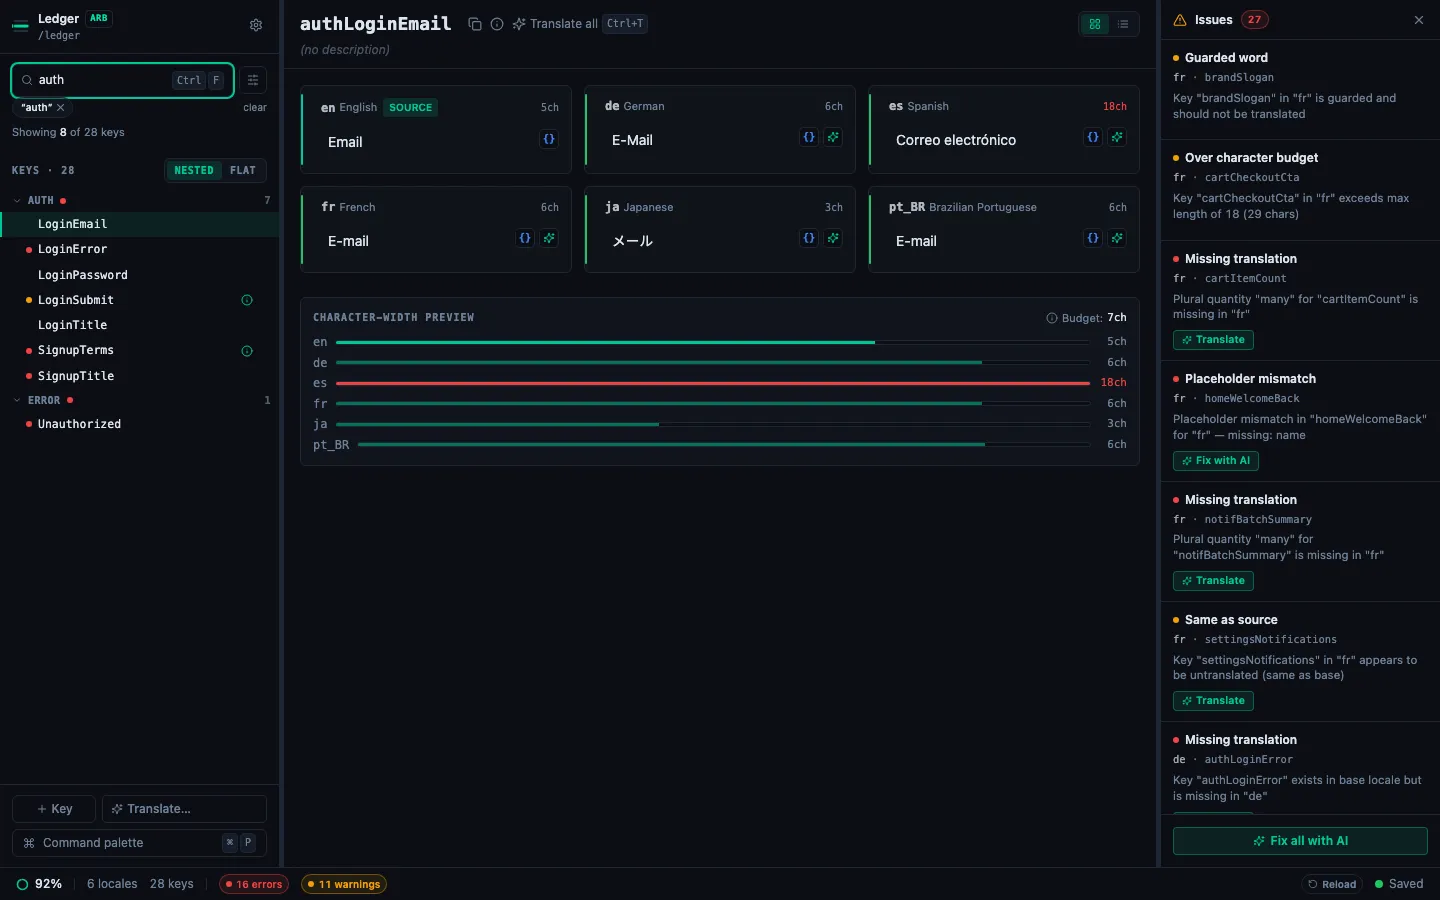
When a filter is active, the sidebar shows chips of each filter and a "Showing N of M keys" count.
Editing a cell
Click a locale's value in the detail pane → an inline input appears. The same keyboard shortcuts apply as always:
| Key | Action |
|---|---|
| Enter | Save and move to the next locale |
| Tab | Save and move to the next locale |
| Shift+Tab | Save and move to the previous locale |
| Escape | Cancel — restores the original value |
| ⌘Z | Undo changes in the current cell |
Edits auto-save to the source file — no export step.
Reading the validation rail
Every locale row has a thin 2px colored rail on its left edge:
- Mint — source / base locale.
- Green — translated, clean.
- Amber — warning (placeholder drift, approaching length budget).
- Red — error (missing required placeholder, over length budget, ICU parse error).
Hover the rail for a tooltip with the first issue message. When you enter edit mode on a problematic cell, a loud inline badge also appears for explicit feedback. See the validation badges guide for what each code means.
Char-width preview
Each list-mode row has a mini bar showing current ch count vs. the budget. Over-budget bars turn red. Budget comes from the key's x-max-length metadata if set; otherwise a heuristic based on the base value's length. In Grid mode the bars live in a summary panel at the bottom of the detail pane so you can compare locales side by side.
Plural keys
If the key is a plural (has an @@plural marker or is already a plural map), the detail pane expands into one panel per locale with per-quantity rows (zero, one, few, many, other). Each quantity gets its own rail, char-width bar, and {} ICU editor button.

When a locale is missing a plural category that its CLDR rules require (e.g. few and many for Polish), the Add form: chips at the bottom highlight those categories in blue. Optional categories stay muted.
AI translate buttons
Each non-base locale cell has a ✨ button next to its value. Click it to translate that one cell via your configured AI provider. A spinner replaces the button while it runs; the result auto-saves.
For batch translation across many cells, open the command palette (⌘P) and pick Translate all missing with AI — see Translate all missing.
Keyboard shortcuts summary
| Shortcut | Action |
|---|---|
| ⌘P | Open the command palette |
| ⌘F | Focus the sidebar search |
| ⌘J | Toggle the Issues panel |
| ⌘⇧I | Toggle Issues-only filter |
| ⌘T | Translate the active key into every non-base locale |
| ? | Show the keyboard shortcuts cheatsheet |
| ⌘, | Open Settings |
| ↑ / ↓ / ⌘→ / ⌘← | Navigate between keys |
| Tab / Shift+Tab / Enter / Escape | Edit mode navigation |
Every shortcut in this list can be rebound from Settings → Keybindings — see Customize keybindings.